
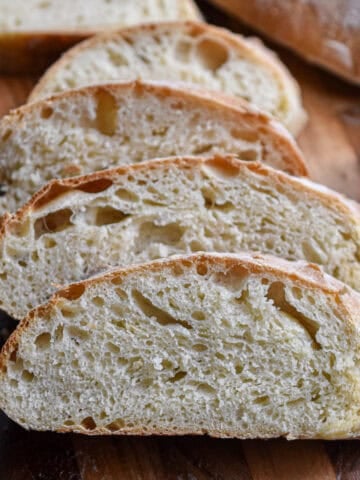
This Rustic Kefir Bread has a delicious soft crumb, a classic crispy crust, and is so easy to make! With a little bit of patience and a few simple ingredients, you'll have easy homemade bread in no time!

Homemade bread is one of my favorite things to make. It is so satisfying to see a few simple ingredients turn into a delicious loaf of bread.
This bread is kind of like sourdough, except we are not using a sourdough starter. We are using commercial yeast and whole milk, plain kefir. The kefir gives the bread a soft crumb that is perfect for toasting, dipping in oil, or dipping in your favorite soup!
This recipe is brought to you in collaboration with Lifeway Kefir. Thank you for supporting the brands that make my blog possible!
Jump to:
What is Kefir?
Kefir is a tart and tangy cultured milk. It is full of good-for-you probiotics and is high in calcium and protein. In this recipe, we are using kefir where you would normally use buttermilk. The consistency is a little thicker than buttermilk and gives the bread a tang that you don't get from regular milk or water.
Ingredients to Gather

- Flour. Bread flour is best, but you can substitute all-purpose flour if it is the only type of flour you have on hand.
- Whole Milk Kefir. Make sure it's plain, we don't want to flavor this bread.
- Salt. To slow down the production of yeast, so it doesn't get out of hand.
- Honey. To feed the yeast. Maple syrup can be used instead of honey.
- Active Dry Yeast. One package, or 2 ¼ teaspoons.
The Best Type of Flour for Breads
The best type of flour to use for bread is bread flour. Bread flour has a higher protein content, and high protein means more gluten in your bread loaf, giving you a softer, more chewy texture.
If you don't have bread flour handy, all purpose flour can be substituted. You won't build up as much gluten as you would with bread flour, but the difference won't be very noticeable.
Whole wheat flour can be used in bread as well, but you don't want to use all whole wheat flour. That can turn the bread very tough, and it would have a bitter flavor. I like to use 50% bread flour and 50% whole wheat flour.

Equipment You'll Need
Let's Make Rustic Kefir Bread!
In the bowl of a stand mixer fitted with the dough hook, add all of the ingredients. Turn the stand mixer on low and start mixing. Mix the dough for 5 minutes until it comes together into a ball. It will look very shaggy at first, like it won't come together, but it will.
Once the dough comes together into a ball, cover the bowl with plastic wrap or a damp kitchen towel. Place it in a warm, draft free area for 6-8 hours, until the dough has doubled in size and the top looks soft and bubbly.
Turn the dough out onto a lightly floured surface and knead it for 1 minute, shaping it into a ball. Place the ball on a piece of parchment paper and let it rest for 1 hour.
Lynn's Tip! It's important to let the dough rest after it has been shaped into a ball. This relaxes the gluten and ensures that the loaf of bread does not turn out tough.
Preheat the oven to 450 degrees. Make a slice down the middle of the dough to help with the rise of the bread. Place the parchment paper and dough in a Dutch oven, covered. Put the Dutch oven in the oven for 20 minutes. After 20 minutes, reduce the heat to 425 degrees, remove the lid from the Dutch oven, and bake for another 30 minutes.
The bread is done when it is browned crust, and it sounds hollow when you tap on it.
Step By Step Photos


Tips and Tricks
- You can make this recipe without a stand mixer, you'll have to use some muscle because this dough takes a few minutes to come together, but it's possible!
- Though it may be tempting, do not cut the bread until the loaf has had time to cool. The inside of the bread needs to set its structure and cool almost completely before it is sliced.
- Depending on the temperature in your kitchen, the dough may take longer than 6 hours to rise. If your kitchen is warmer than average, it might take only 6 hours. If your kitchen is cooler than average, it might take up to 10 hours to rise. Just be patient with bread.
- The bread should sound hollow when you take it out of the Dutch oven and tap on the bottom of it. If you are not comfortable with doing that, use a meat thermometer and insert it into the loaf. The bread should have an internal temperature of 190 degrees.
- Serve this bread with strawberry jam, peach jam, blueberry jam, or mixed berry jam for a delicious breakfast!
- If you have some leftover bread, make it into a delicious Blueberry French Toast Casserole!

Frequently Asked Questions
Yes! Bread freezes wonderfully! Once the bread is cooled, wrap the bread plastic wrap and place it in a Ziploc bag. The bread will freeze for up to 3 months. To defrost, place the bread on the counter and let it come to room temperature.
To keep this bread fresh, place it in a Ziploc bag on the counter. It will stay fresh for 4 days. Slice whenever you are ready to use it. Do not place the bread in the refrigerator. That will cause the bread to go stale quickly.
Yes! You can make the dough completely and then shape it into a ball. Place the ball in a banneton basket or a large bowl lined with a kitchen towel. Put the dough in the refrigerator and cover it with plastic wrap or a kitchen towel. When you are ready to bake, preheat the oven and bake the dough in the Dutch oven.

More Kefir Recipes
- Mixed Berry Kefir Smoothie
- Strawberry Kefir Ice Cream
- Blueberry Kefir Bread
- Kefir Snickerdoodles
- Kefir Cornbread
- Vanilla Kefir Muffins
- Sweet Kefir Mango Pancakes
Did you make this recipe and love it?
If you did, don't forget to leave a 5-star review and comment below! Show me your creation on Instagram or Facebook. Just mention @Lynn'sWayofLife or use this hashtag #lynnswayoflife.
📖 Recipe

Rustic Kefir Bread
Ingredients
- 4 cups All Purpose Flour
- 1 ½ cups Whole Milk Kefir
- 1 ½ teaspoon Salt
- 2 tablespoon Honey
- 2 ¼ teaspoon Active Dry Yeast One Package
Instructions
- Add all the ingredients to a stand mixer fitted with the dough hook.
- Mix on low speed for 5 minutes until the dough forms a ball. It will look shaggy at first, but then it will come together.
- Once the dough comes together into a ball, cover the bowl with plastic wrap or a damp kitchen towel. Place it in a warm, draft free area for 6-8 hours, until the dough has doubled in size and the top looks soft and bubbly.
- Turn the dough out onto a lightly floured surface and knead it for 1 minute, shaping it into a ball. Place the ball on a piece of parchment paper and let it rest for 1 hour.
- Preheat the oven to 450 degrees.
- Make a cut down the center of the dough ball.
- Place the parchment paper and dough in a Dutch oven, covered. Put the Dutch oven in the oven for 20 minutes. After 20 minutes, reduce the heat to 425 degrees, remove the lid from the Dutch oven, and bake for another 30 minutes.
- The bread is done when the crust is brown, and it sounds hollow when you tap on it.
Notes
- You can make this recipe without a stand mixer, you'll have to use some muscle because this dough takes a few minutes to come together, but it's possible!
- Though it may be tempting, do not cut the bread until the loaf has had time to cool. The inside of the bread needs to set its structure and cool almost completely before it is sliced.
- Depending on the temperature in your kitchen, the dough may take longer than 6 hours to rise. If your kitchen is warmer than average, it might take only 6 hours. If your kitchen is cooler than average, it might take up to 10 hours to rise. Just be patient with bread.
- The bread should sound hollow when you take it out of the Dutch oven and tap on the bottom of it. If you are not comfortable with doing that, use a meat thermometer and insert it into the loaf. The bread should have an internal temperature of 190 degrees.

Gemma says
I substituted some whole wheat flour for white and let it rise a little longer. Has a pleasant tang to it. Nice crust and crumb
Mac says
I let it rise longer, turned out perfect
Debra McKasson says
Have you used an alternative sweetener in this recipe? I am considering using Monk Fruit with allulose. It will cut down on the carbs.
Lynn Polito says
Hi! I haven't tried, I'm sorry! I don't usually use alternative sweeteners so I can't say how it would work.
Gigi says
Learned a lot here!
Wish I had the time to bake again! 🤪✌🏼💝💝💝