
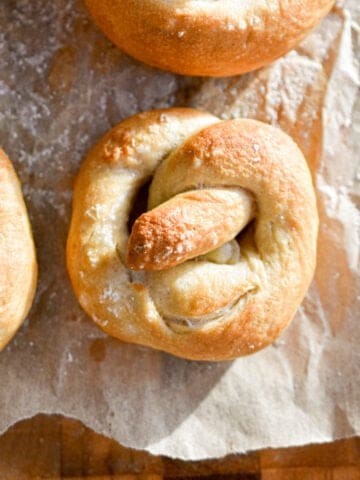
As someone who bakes sourdough regularly, I can tell you that these Simple Sourdough Breadsticks are both impressive and surprisingly easy to make! With a chewy interior, tender softness, and a perfectly crispy crust, they’re a delicious addition to any dinner and a great way to bring the restaurant worthy breadsticks right to your table!

These breadsticks are the perfect recipe to use up some of that sourdough starter in your refrigerator. No need to knead the dough or break out any heavy equipment, these breadsticks are delicious and so easy to make!
When making any type of sourdough bread, there are a few essential tools for making sourdough bread that would be helpful in making this recipe. This sourdough glossary is super helpful is familiarizing yourself with all the sourdough terms.
Everyone loves a sourdough bread roll or a crusty loaf of sourdough bread, but a breadstick is perfect for dips, soups, or as an afternoon snack!
If you love sourdough, be sure to join our Sourdough Facebook group with other Sourdough fanatics sharing their favorite recipes as well as tips and tricks!
Jump to:
- What is Sourdough?
- Ingredients You'll Need for No Yeast Breadsticks
- How To Make Sourdough Breadsticks
- Sample Baking Schedule
- Tips and Tricks for Making Homemade Breadsticks Without Yeast
- Sourdough Breadstick Recipe Variations
- What To Serve with Sourdough Breadsticks
- Sourdough Bread Sticks Storage Tips
- Sourdough Breadsticks Recipe FAQs
- More Sourdough Recipes
- 📖 Recipe
What is Sourdough?
Sourdough bread is a bread made from natural yeast, flour, water, and salt. There is no commercial yeast, only naturally occurring yeast from the environment.
Sourdough bread requires a "starter" to rise the bread. A starter is filled with good bacteria and natural yeast that gives the bread that traditional sour taste. Unlike commercial yeast, sourdough starters take a much longer time to make the bread rise, so a sour flavor develops as the water, flour, and wild yeast ferment. You can make your own sourdough starter at home, buy one, or get it from a fellow sourdough friend.
These sourdough breadsticks, just like same day sourdough bread, are made with sourdough starter instead of commercial yeast. If you are new to keeping a sourdough starter, make sure to check out this post about keeping a sourdough starter alive.
Ingredients You'll Need for No Yeast Breadsticks

- Sourdough starter. It should be active and bubbly, fed at least twice before baking with it.
- Flour. Bread flour is best to make bread, but all purpose flour can be used as well.
- Sugar. To feed the wild yeast in the sourdough starter.
- Water. To add hydration to the breadsticks.
- Salt. This keeps the yeast in check and adds flavor to the breadsticks.
The Best Flour For Sourdough Breadsticks
The best type of flour to use for bread is bread flour. Bread flour has a higher protein content, and high protein means more gluten in your bread loaf.
If you don't have bread flour handy, all purpose flour can be substituted. You won't build up as much gluten as you would with bread flour, but the difference won't be very noticeable.
Whole wheat flour can be used in sourdough bread as well, but you don't want to use all whole wheat flour. That can turn the bread very tough and it would have a bitter flavor. I like to use 50% bread flour and 50% whole wheat flour.
Equipment To Gather
How To Make Sourdough Breadsticks
In a large mixing bowl, mix together the water and starter. Add the flour, sugar, and salt. Mix until the dough comes together. Cover with a damp kitchen towel and let the dough rest for 1 hour.


After one hour, fold the dough onto itself so it forms a smooth dough. Cover the dough again and let it rise for 8-10 hours or until the dough has doubled in size.
Lynn's Tip! If you kitchen is cooler, it will take longer for the dough to rise. If you kitchen is warmer, your dough will take less time to rise. Just keep an eye on it.


After the dough has doubled in size, turn the dough out onto a lightly floured surface. Cut the dough into 12 pieces and roll the dough into breadstick shapes. Line a baking sheet with parchment paper or a silicone mat. Place the breadsticks on the baking sheet and cover it again with a damp kitchen towel. Let the dough rest for 1 hour.
Preheat the oven to 425 degrees. Brush the breadsticks with water and sprinkle sesame seeds onto the dough. Bake for 25 minutes or until the breadsticks are golden brown and crisp. Serve immediately.


Sample Baking Schedule
- Day before- Feed and refresh your sourdough starter
- 8am- Mix together ingredients.
- 9am (Bulk Rise)- Fold the dough over itself. Cover and let it rise.
- 4pm- Shape the breadsticks on a baking sheet.
- 5pm- Bake the breadsticks for 30 minutes
Tips and Tricks for Making Homemade Breadsticks Without Yeast
- Sourdough breadsticks are best served immediately out of the oven. As they cool they get chewier.
- To check if your starter is ready to bake with, place a tablespoon of starter into water. If the starter floats, it is ready to bake with. If it sinks, feed it again, and make the breadsticks the next day.
- When making breadsticks, it is most important to weigh out the ingredients. That is the best way to get the most accurate measurements.
- The breadsticks are done when they are golden brown and just a little crispy.
- Parchment paper or a silicone mat will make sure that the breadsticks do not stick to the baking sheet.

Sourdough Breadstick Recipe Variations
- Change up the seasoning! Make these breadsticks plain, with sesame seeds, with poppy seeds, or with everything bagel seasoning.
- Stuff them! Add mozzarella to the inside of the breadsticks and roll the dough around the mozzarella. Bake them for 25 minutes or until golden brown.
Sourdough Garlic Breadsticks
- Make them garlic bread! After the breadsticks are baked, spread melted butter and garlic powder over the breadsticks.
What To Serve with Sourdough Breadsticks
These breadsticks are perfect for soups, stews, or perfect to dip in your favorite party dip!
- Instant Pot Broccoli Cheddar Soup
- Pizza Casserole with Pasta
- Spicy Hummus
- Meat and Vegetable Lasagna
- Dill Pickle Hummus
- Instant Pot Cauliflower Soup
- Roasted Broccoli and Cauliflower soup
- Pasta Bolognese
Sourdough Bread Sticks Storage Tips
To make the dough in advance. Once the dough has risen, you can keep it in the refrigerator up to 24 hours before you would like to bake it. Make sure the kitchen towel stay damp so you don't form a skin over the dough.
How to store the breadsticks. Cool the breadsticks to room temperature and then keep it in an airtight container or a gallon sized Ziploc bag on the counter. It will stay fresh up to 4 days.
Lynn's Tip! Do not store homemade bread or homemade breadsticks in the refrigerator. It will go stale quickly and it will also promote the growth of mold.
How to freeze the breadsticks. Once the breadsticks have cooled completely, place it in a gallon sized Ziploc bag. It can be frozen up to 3 months. To defrost the breadsticks, place it on the counter until it thaws completely.

Sourdough Breadsticks Recipe FAQs
It's not recommended. A kitchen scale provides the most accurate measurements for bread, and accuracy is super important when making bread. Kitchen scales can easily be found on Amazon and are not very expensive. Keep one in your kitchen cabinet for days like this. You will be surprised how often you use it!
Yes! You can use commercial yeast and remove the sourdough starter completely. That would speed up the time too and you would only need to let the dough rise for 2 hours.
To make these sourdough breadsticks extra crispy, make them thinner and longer. Watch when you bake them so you do not burn them. To make them fluffier, you can make them shorter and they will be thicker, perfect for dipping in soup!
If your sourdough breadsticks are coming out flat, it could be one of the following issues:
One of the main reasons is proofing. If the dough hasn’t risen enough, it won’t have the airiness needed to puff up, but if it’s over-proofed, the gluten structure can collapse, leaving the breadsticks flat.
Also, check your starter. If it isn’t bubbly and active, the dough won’t get enough lift.
Finally, oven temperature matters, if the oven isn’t hot enough, the breadsticks can spread before the crust sets. Paying attention to these factors will help your sourdough breadsticks come out soft, puffy, and perfectly shaped.
More Sourdough Recipes
- More Sourdough Recipes
- Sourdough Pretzel Bites
- Cinnamon Raisin Sourdough Bread
- Sourdough Gingerbread Cookies
- Chocolate Chip Sourdough Cookies
- Pie Crust with Sourdough Discard
Did you make this recipe and love it?
If you did, don't forget to leave a 5-star review and comment below! Show me your creation on Instagram or Facebook. Just mention @Lynn'sWayofLife or use this hashtag #lynnswayoflife.
📖 Recipe

Sourdough Breadsticks Recipe (No Yeast Breadsticks)
Ingredients
- 100 g Sourdough Starter Active and Bubble
- 300 g Water Lukewarm
- 15 g Sugar
- 500 g Bread Flour
- 10 g Salt
Instructions
- In a large mixing bowl, mix together the water and starter. Add the flour, sugar, and salt. Mix until the dough comes together. Cover with a damp kitchen towel and let the dough rest for 1 hour.
- After one hour, fold the dough onto itself so it forms a smooth dough. Cover the dough again and let it rise for 8-10 hours or until the dough has doubled in size.
- After the dough has doubled in size, turn the dough out onto a lightly floured surface. Cut the dough into 12 pieces and roll the dough into breadstick shapes. Line a baking sheet with parchment paper or a silicone mat. Place the breadsticks on the baking sheet and cover it again with a damp kitchen towel. Let the dough rest for 1 hour.
- Preheat the oven to 425 degrees. Brush the breadsticks with water and sprinkle sesame seeds onto the dough. Bake for 25 minutes or until the breadsticks are golden brown and crisp. Serve immediately.
Video
Notes
- All purpose flour can be used instead of bread flour.
- These breadsticks are best served right out of the oven.
- The breadsticks are done when they are golden brown and just a little crispy.
- Parchment paper or a silicone mat will make sure that the breadsticks do not stick to the baking sheet.

Sara Oliver says
Exactly the recipe I was looking for! I worked in a bakery when I was a teenager about 25 years ago. We made the best sourdough breadsticks and the memory recently came back to me. Went on a search for a comparable recipe and this is perfect! Just a bit of large grain salt on the top and I was in heaven!
Lynn Polito says
I am so happy you enjoyed them! Thanks for making my recipe!